DevOps Organisation Settings

Lets have a look in a little more detail at the Settings for the DevOps Organisation Level and at what the Organisation is.

When setting up DevOps, it created at Organisation level of [My Name] , and another Organisation was then created manually for the company

Organisations can be treated as accounts and each organisations has its own URL. You will also hear organisations being called Collections

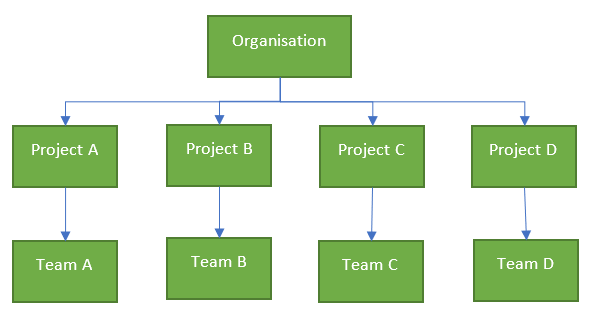
You must always start with one organisation but you can have multiple.

Go to Organisation Settings

General

Overview

This gives you the overview of the Devops organisation and there are a few options in here to be aware of

Privacy URL

Your Privacy URL can be added here to link to your organisations document describing how we handle internal and external guest data. If you have a public website or app you are required to have a dedicated Privacy policy URL.

Q Do you have a privacy document already in place?

https://www.freeprivacypolicy.com/blog/privacy-policy-url/

Organisation Owner

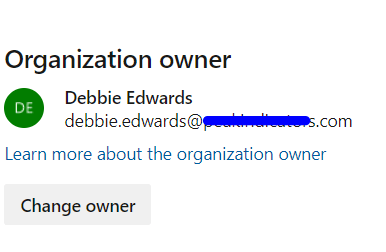
the owner is set against the person who created the organisation account but this can be changed.

Projects

New Projects can be set up here. See https://debbiesmspowerbiazureblog.home.blog/2020/03/06/create-a-devops-project/

Users


A good area to find out the Access levels for each user

  • Stakeholder: Partial access and can be assigned to unlimited users for free
  • Basic: Provides access to everything but test plans. Up to 5 users free, then £4.48 per month
  • Basic + Test Plans: Includes test plans. £38.76 per month
  • Visual Studio subscription: For users with a Visual Studio Subscription and features are enabled based on Visual Studio Enterprise, Professional Test Professional or MSDN Platform

Group Rules

DevOps includes group based licensing for Azure Active Directory (Azure AD) Groups and Azure DevOps groups.

Azure Active Directory Groups are created in Azure Active Directory


DevOps Groups and Collection Level Groups can be found within the Permissions section so we can look at this in more detail later.

Add a group Rule to assign an access level or extention to the group and resources in Azure DevOps are assigned to all members of the group.

When users leave a group the licenses are freed and returned to your pool.

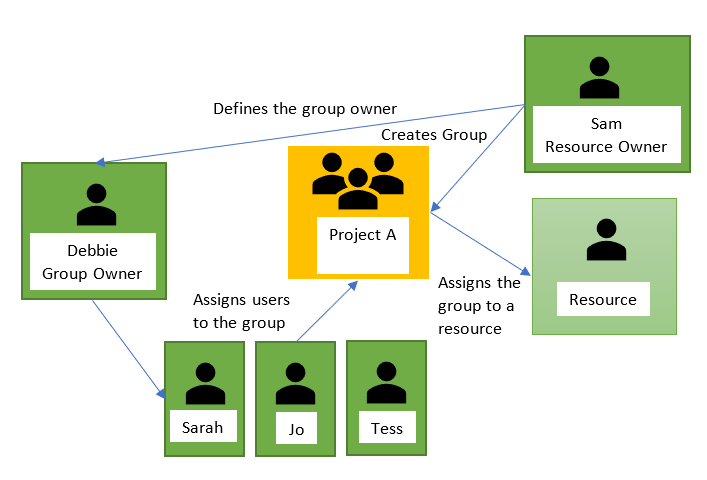
Imagine this scenario

It will be easier to add the following Groups

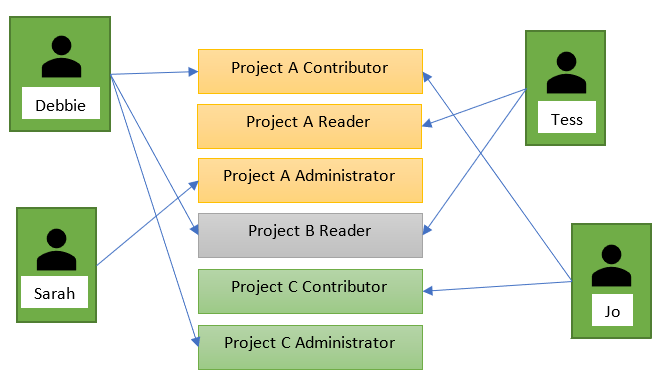
  • Project A Contributor Group and add Debbie and Jo
  • Project A Reader Group and add Tess
  • Project A Administrator Group and add Sarah
  • Project B Reader Group and add Debbie and Tess
  • Project C Contributor and add Jo
  • Project C Administrator and add Debbie

To manage licenses and group rules, you must be a Project Collection Administrator (PCA) for the organization. Check this within Security > Permissions

Click Add a group rule

Both users within this new group have a visual Studio account so Group Level is set to to Visual Studio. However with Group Rules you assign the Access level for the Users at Group Rule Level

At this point I also added a new Group.

You can click on the … Button after Last Evaluated to get to either Manage Group Rules or Manage Members

These are the two rules for this group

What happens when your users have a mix of access levels within the one User Group?

The Users get their Access Levels from the Rule so their Access level would be reset

Billing

Before Looking at Billing you can use the Azure Calculator to get more of a feel of what you need

https://azure.microsoft.com/en-gb/pricing/calculator/?service=azure-devops

Note that you are paying for 5 basic plans, the first 5 are free but the 10 developers who need the Basic + Test Plans License are the ones adding to the monthly cost


Why would you up Additional Parallel CI/CD jobs on either Microsoft Hosted of Self hosted Pipelines?

See Parallel jobs for more information

Azure DevOps Billing is through Azure and because Billing has not yet been set up we only have access up to the Free Tier limits

If you click on Set up Billing You need to choose an Azure Subscription to add it too

You cant add it to your Personal credits because of the spending Limit caps. Once set up you can then manage the paid access for your users, bearing in mind the free usage tier

https://docs.microsoft.com/en-us/azure/devops/organizations/billing/buy-basic-access-add-users?view=azure-devops

Auditing

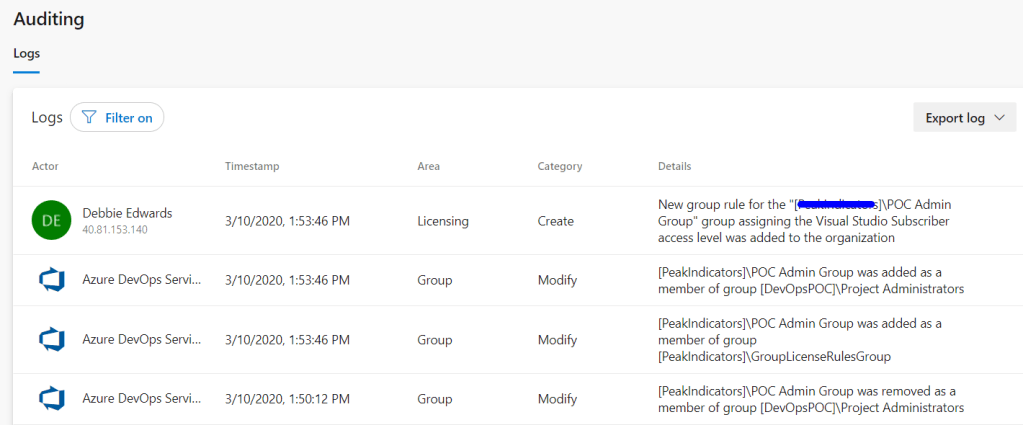
Allows you to see all the audit-able events and you can export the log and filter on specific events

Global Notifications

You will recieve notifications for lots of Actions in DevOps like when a build completes or a Deployment approval is pending. You can configure the organisation notifications from here

Usage

Usage allows you to see whats been going on in DevOps


You can also filter the information and choose your columns that you are interested in

You can Select

  • TFS (Any application within the Organisation Service account, e.g. TFS https://dev.azure.com/Organisation/)
  • Release Management (Any application within Release Management Service)
  • Analytics (Any application within the Analytics Service)

Statuses

  • Normal
  • Delayed
  • Blocked

And time period, for example, the last 7 days.

Extensions


You can browse the marketplace for additional DevOps Services. Like Analytics above to gain insight into the health and status of your DevOps Projects

Just Searching for Git brings up lots of free Git Services that you can use

Azure Active Directory

When DevOps was accessed, an email was used that was connected to a Tenant in Azure because we use Office 365

Office 365 uses Azure Active Directory (Azure AD) to manage user identities behind the scenes. Your Office 365 subscription includes a free subscription to Azure AD so that you can integrate Office 365 with Azure AD if you want to sync passwords or set up single sign-on with”

Because of this, Azure DevOps connected up the Azure Active Directory

Security

Policies

If we never want to allow Public Projects we can simply set the above policy to Off.

We can also dis-allow external guest access through policies

Permissions

Project Collection Administrator Has permissions to administer build resources and permissions for the collection

A collection is a container for a number of projects in Azure DevOps and corresponds to the Organisation.

Lets set up another Project Collection Administrator

We want everyone in the POC Admin Group to also be a Project Collection Administrator

The DevOps Groups that have been created and Collection Level (Enterprise Level) Groups can all be seen here

You can also look at the users and access all the Settings per user from the User tab.

Boards

Process

Gives you more information on what will be available on the board for each type, e.g. Agile, Scrum etc.

Pipelines

Agent Pools

DevOps Pipeline Pools are scoped to the entire organisation so they can be shared across Projects. You don’t need to manage Agents individually. You can organise them into Pools

An agent is installable software that runs one job at a time.

With Microsoft hosted agents, every time you run a pipeline you get a fresh virtual machine which is discarded after use
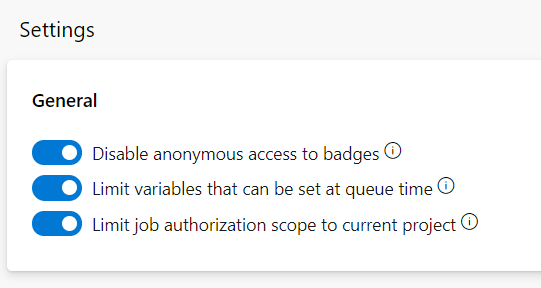
Settings

This is an example status badge in Boards

You can set variables at queue time unless the above option is enabled. Only variables Settable at queue time can be set if its limited

By default, the collection (Enterprise)-scoped identity is used, unless the Limit job authorization scope to current project is set in Project Settings > Settings.

Deployment Pools

An agent pool (Above) defines the sharing boundary for all agents in that pool. Whereas deployment Pools are about deployment target machines that have agents installed on them.

Deployment pools are convenient when you want to deploy a project to different machines

Deployment groups represent the physical environments; for example, “Dev”, “Test”, “UAT”, and “Production”.

The deployment group is a layer over the deployment pool which makes the targets available to the release definitions within a project

Parallel Jobs

As we have already established. The free tier allows you to have 1 parallel job but What is a parallel job?

A job is a set of one or more build tasks that run sequentially on the same target.

You could have for example a project that contains a web app and a Web API. They dont need to be run sequentially, they can be run in parallel to save time

Each App type can equate to 1 job within a build definition. Each build definition as its own build pool/agent

If you have two licensed build pipelines you could run them concurrently which will decrease overall build time.

You could also split up tests across jobs to be executed across parallel builds which will reduce the overall time

You need to look at your Projects and what you are building and see if Parallel jobs are relevant to you, or if you are happy for the agents to run your builds sequentially

Oauth Configurations

Register and Authorise your app
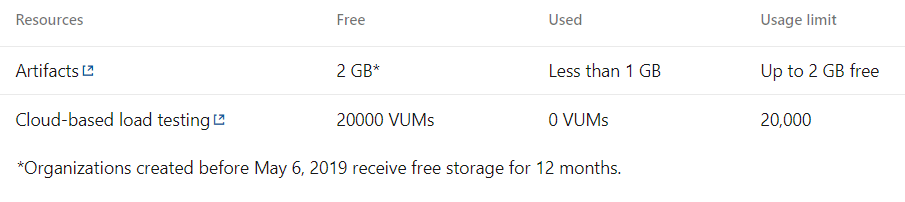
https://docs.microsoft.com/en-us/azure/devops/integrate/get-started/authentication/oauth?view=azure-devops

Artifacts

Storage

Check the storage sizes of your artifacts. Remember you get 2 GB free for your artifacts.

Hopefully this gives you a little more information of each sections of your organisational settings. You need to understand at a basic level

  • Who your teams will be and what they will require (Set Access Levels, Groups and Rules up)
  • What you will be creating and can they be built in parallel?
  • what environments will you be releasing too

Each section can then be looked at in much more detail

Create a DevOps Project

At this point we know that we are using DevOps Service rather than the on premesis DevOps Server so go to https://azure.microsoft.com/en-us/services/devops/?nav=min

To get to your initial DevOps page

Which gives you three routes in. Do you…

  • Start Free?
  • Start Free with GitHub?
  • Or Sign in to Azure DevOps if you already have an account?

At this point, we don’t have an account

Making Sense of DevOps Pricing

Start Free or Start Free with Github

Start free with GitHub

Use this option if you already have a GitHub account

In this example Start for free option is used. Because [I] have an azure account, DevOps is already logged in and it knows what my tenant is.

At this point there is no suggestion of a 30 day trial or any other information. so for the time being lets get started by adding a project (This is because I have a Visual Studio account. This may be different for uses without a Visual Studio Subscription)

Also Note the level https://dev.azure.com/debbieedwards

This is the organisation level and this is my own personal devOps account. What happens if you want to set up a New Organisation to connect related projects and scale out to enterprise Level?

Select New organisation

And New Project

the New Organisation level has been set up with the Companies name

I can now start working with DevOps at an organisational level. We can have 5 basic users for free so for the time being, this is what we will stick to.

We know we want a Private DevOps area

Version Control Git has been selected because this seems to be the one that other team members are the most comfortable with

Work Item Process Agile, Basic, CMMI, Scrum

The default is Agile but lets have a quick look at each of these processes

Basic

The simplest model.

Agile

Agile includes scrum, Works great if you want to track user stories and bugs on a kanban board

Scrum

Supports the Scum methodology. Really good for tracking backlog items and bugs on a kanban board.

CMMI

if your team follows more formal methods use CMMI (capability Maturity Model Integration.

For this Project, the Agile approach is selected

Invite a user into the Project.

Under 5 users and DevOps is free. We wont be doing anything with test plans at the moment so lets add one other user into this area

DevOps Access Levels

  • Stakeholder can be assigned to users with no license or subscriptions and need a limited set of features
  • Basic Provides access to most features. up to 5 users is free
  • Basic + Test Plans The user has access to test plans but this costs around £34 a month extra and you dont get any free accounts
  • Visual Studio Subscription – Assign to users with a Visual Studio Subscription

Check Levels of Access


Go back up to the organisational level and select Organisation settings in the bottom left hand corner of the screen


Next go to users and you can check the settings. Note that one account is under a Visual Studio Enterprise Subscription so this is assigned to users who already have a Visual studio Subscription.

We have 1 basic account which will be free at the moment

Checking Spending

Obviously the one thing you want to do is check that you aren’t spending money unnecessarily.

Still in Organisation Settings

Currently there is no billing applicable but this section will need a more detailed how to later on

Checking what has been done at organisation level

Here you can see that Tess has been added by myself to a Group and her access was set to basic.

There should be a post coming a long soon that will look into Organisational Setting in more detail

We have created a project and set up new users with Basic level accounts.

Getting back to your Project

Close Devops down and then re open


This time you can sign in and go straight to your new project

Next time we will start using some of the services on offer like Boards, Repos, pipelines, test Plans and Artifacts

Making Sense of Pricing for Azure DevOps to get started

You decide that Azure DevOps is the way to go because you want to make use of all the features. Specifically

  • Azure pipelines to build and release code
  • Boards to do all your planning
  • Repos so you can use, for example GiT as your code repository
  • Artifacts to share packages across projects
  • Test Plans to help you test what you have built

Azure DevOps Services Costings

DevOps is free for Open Source projects and small projects up to 5 users

https://azure.microsoft.com/en-gb/pricing/details/devops/azure-devops-services/

Azure DevOps Services

Individual Services

Taking Azure DevOps Services as the starting point, The first area to look at is Individual Services


There are only two individual services to choose from. Pipelines and Artifacts. this would be useful if you choose if you simply want to be able to build code and release it into specific environments and save your artifacts for use across projects

CI/CD -Continuous Integrations and Continuous Delivery or deployment

Along with these two services there are sliders so you can optimise the services for your requirements and it would be helpful if there were more information about the different options

Azure pipeline Options

First of all we need to understand the Microsoft Hosted will be in the public cloud. The jobs are run on a pool of Microsoft Hosted Agents. Basically, each time a job is run, a fresh VM gets created and then discarded after use. and Self Hosted will be ion premises using self hosted agents. .

With the above option you can only run one job at a time for free that runs for 1,800 mins at a time. And remember that your job is building and releasing code.

lets see what happens with Microsoft hosted if move the Microsoft hosted slider to 10?


Its not clear what this actually means. would you be paying £298 per month at the top end if you had 10 developers using the service concurrently, or do you simply pay for what you use.? So if you don’t go to more than one concurrent job at a time its still free?

Azure Artifact Options

This is clearer. Artifacts are stored so you are paying for storage.

User Licenses

If you want to use all or most of the services you can get an individual user License, Much in the same way that you would but in Power BI Pro per user license.

The only difference between the Basic plan and the Basic + Test plans is Test plans but there is a fairly big price difference.

The question is, how useful is testing plans and can you do with out them? Testing plans will be looked at in more detail later

Basic Plan

If you are happy to go without Test plans its worth looking in more detail at the fine points


However….

Azure Pipelines: Includes the free offer from INDIVIDUAL SERVICES and the free offer is specifically for 1 Free parallel job

Does that mean that even paying 4.48 per license you may have extra charges if you run a job in parallel to another developer?

If two developers are running at the same time who gets hit with the charges?

Could this be understood as being if a user puts two jobs out concurrently and if two users have a job running each, this wouldn’t be charged as its per user?

Artifacts 2 GB free per month and then the assumption is that you move on to pay for extra storage. Is this a pay as you go model?

Basic + Test Plans

The same criteria applies to the plan so the same questions still apply

There are no Free plans with this and the cost is £38.76 per user per month so this assumption is that this plan would only be required for users who will need to test the system?

More information is required in regards to Test plans and are they worth the extra £34.28 a month?

Azure DevOps Server

DevOps Server is the on premises offering built on a SQL Server backend. DevOps Server is a good option when all your services are on premises and you have, for instance Microsoft SQL Server 2019

You can either pay month to month through Azure or buy a 3 year software license.

If you buy through Azure it entitles you to use the cloud service.

With either option you need Windows or Windows Server Licenses for the Servers running Azure DevOps Server 2019

Team Foundation Server is now Azure DevOps Server.

Pricing is not established on the web site so it may need to be a call to the Microsoft Sales team to ensure you get the right fit for your needs.

If you already use the cloud the recommendation will be to go for a DevOps Service

However there are still some questions in relation to this and what is the best option, and can these options be mixed and matched when dealing with different types of users?

Introduction to Azure DevOps

What is Azure?

Taking the first part of Azure DevOps, Azure is Microsoft’s Cloud computing platform. It hosts hundreds of Services in over 58 regions (e.g. North Europe,West US, UK South) and available in over 140 countries.

As you can see, lots of Azure services have already been consumed throughout these blogs. Azure SQL Databases, Azure Data Lake gen2, Azure Blob Storage, Azure Data Factory, Azure Logic Apps, Cognitive Services etc.

Business Processes are split into Infrastructure as a Service Iaas (VMs etc) , Platform as a Service PaaS (See the services above) and Software as a Servie SaaS (Office 365, DropBox, etc)

You can save money by moving to this OpEx model (Operational Expenditure) from the CapEx model (Capital Expenditure) because you pay for what you need as you go, rather that having to spend money on your hardware, software, data centers etc

Cloud Services use Economies of Scale, in that Azure can do everything at a lower cost because its operating at such a large scale and these savings are passed to customers.

On Demand Provisioning

When there are suddenly more demands on your service you don’t have to buy in more hardware etc. You can simply provision extra resources very quickly

Scalability in Minutes

Once demand goes down you can easily scale down and reduce your costs. Unlike on Premises when you have to have maximum hardware requirements just in case.

Pay as you Consume

You only pay for what you use

Abstract Resources

You can focus on your business needs and not on the hardware specs (Networking, physical servers, patching etc)

Measurable

Every unit of usage is managed and measurable.

What is DevOps?

A set of practices intended to reduce the time between committing a change to a system and the change being placed into normal production, also ensuring high quality

Testing, Reviews, Moving to production. This is the place where developers and the Operations team meet and work together

Pre DevOps

If we dont work within a DevOps Framework. What do we do?

Developers will build their apps, etc and finally add it into Source Control

Source Control or Version Control allows you to track and manage code changes. Source Control Management Systems provide a history of development. They can help resolve conflicts when merging code from different sources

Once in Source Code the Testing team can take the source code and create their own builds to do testing

This will then be pushed back to the development team and will go back and forwards until everyone is happy. Here we can see that the environments we are using are Dev and Test

Once Complete, it is released into Production.

This is a very siloed approach. Everyone is working separately and things can take time and you will get bottlenecks

The DevOpsApproach

Everyone works together. You become a team and time to market becomes faster. Developers and Operations are working as a single team

DevOps Tools

Each stage uses specific tools from a variety of providers and here are a few examples

  • Code – Eclipse, Visual Studio, Team Foundation Services, Jira, Git
  • Build – Maven, Gradle, Apache Ant
  • Test – JUnit, Selenium
  • Release – Jenkins, Bamboo
  • Deploy – Puppet, Chef, Ansible, SaltStack
  • Monitor -New Relic, SENSU, Splunk, Nagios

We need all these tools to work together so we don’t need to do any manual intervention. This means that you can choose the ones that you have experience in.

Components of Azure DevOps

Azure Boards

People with a Scrum and Project Management background will know how to create the features within the Boards. Epics, Stories, Tasks etc

Developers create and work on tasks. Bugs can be logged here by the testers

Azure Repos

Push the development into Source Control to store your information. Check in your code within Azure Repos.

There are lots of repositories to choose from in Repos to suit your needs like GIT or TFS

Azure Pipelines

Developers build code and that code need to get to the Repos via a Pipeline. The code is built within the Pipeline.

The code is then released into Dev, Test, Prod, Q&A etc, And from, say the test or Dev environments we can……..

Azure Test Plans

Test, using Azure Test plans. For example, if you have deployed a web service, you want to make sure its behaving correctly. Once tested the code will go back to the pipeline to be built and pushed to another environment

Azure Artifacts

Collect dependencies and put them into Azure Artifacts

What are dependencies?

Dependencies are logical relationships between activities or tasks that means that the completion of one task is reliant on another.

Azure Boards

Work Items

The artifact that is used to track work on the Azure board.

  • Bug
  • Epic
  • Feature
  • Issue
  • Task
  • Test Case
  • User Story

So you create work items here and interact with them on the board

Boards

Work with Epics, Features, Tasks, Bugs etc.

Includes support for Scrum (agile process framework for managing complex work with an emphasis on software development) and Kanban (a method for managing and improving work across human systems. Balances demands with capacity)

Backlogs

How do you prioritise your work items?

Sprints

Say your Sprint is 20 days (2 weeks) What work can be accomplished within this sprint?

Dashboards

Overall picture of the particular sprint or release

Repos

We can use GIT or Team Foundation Server TFS. The example uses GIT

  • Files
  • Commits
  • Pushes
  • Branches
  • Tags
  • Pull Requests

You create your own branch from the master branch. Do your testing and changes and push back from your branch to the master branch.

Pipelines

Where is your Code? Its in GiT

Select the GiT source like Azure Repos GIT or GiTHub etc

Get the code from the master branch

How do you want to build the project?

Choose from lots of templates, Azure Web App, ASP.net , Mavern, Ant, ASP.NET, ASP.NET with containers, C# function, Python package, Andriod etc

Next provide the Solution path and the Azure Subscription that you want to deploy to

This takes the source code from the GiT repository and builds the source code.

The build will then give you logs to show you how the build of the project happened

Next time when you check in code, it will automatically trigger the pipeline to build the code

Then the build needs to be Released via a Release Pipeline

This is where you release to the correct Azure Subscription and the code will be deployed. You can also add in approvals to ensure you get the pre approval required to release the code.

Conclusion

This is just a whistle stop tour of Dev Ops. Test Plans and Artifacts haven’t been discussed in much detail but it gives you the basics of what is included in DevOps and how you can start to think about using it.

What do you create in Azure and can it be handled within DevOps?

Can we start using the Boards?

How do we can started with Azure Devops?

Which teams members have the right interests in the specific DevOps areas?

Data Factory to move daily snapshot data in Azure SQL DB to files in a Gen2 Data Lake

I have the following problem to resolve (And this was my initial attempt at figuring out a solution)

I have a data source with data that contains a date. the data contains daily snapshot of a record. this means that a record will be in the data set once per day. This will amount to a lot of data and we would rather hold it as files in Azure Data Lake Gen2 Storage

The logic is to pull daily files from the source database into dated files within the Azure data Lake

Once running this will probably pick up a days data because the rest are already created. However on the initial run I want it to pick up all the days that have been loading.

At the minute I have about 6 months of data to load

Tables in Azure SQL Database (destination)

CREATE TABLE [audit].[MemberDailyMetricsDates](
     [DATEUTC] datetime2 NULL
 ) ON [PRIMARY]

This table collects all the dates from the source snapshot table

Remember, the table records the same record every day with any changes to the record.

CREATE TABLE [audit].[IdWatermarks](
     [TableName] nvarchar NOT NULL,
     [WatermarkValue] [bigint] NOT NULL,
     [WatermarkDate] [datetime] NULL,
     [WatermarkDate2] datetime2 NULL
 ) ON [PRIMARY]
 GO

this is where I add the dates from the tables to show where we are.

For example if we add the last lot of data from 02/01/2020 then this value will be stored in the watermark table. I record them in different formats just in case.

CREATE TABLE [audit].[ProcessingMetrics](
     [ID] [int] IDENTITY(1,1) NOT NULL,
     [TableName] varchar NULL,
     [DateProcessed] [datetime] NULL,
     [DateUTC] datetime2 NOT NULL,
     [Duration] [int] NOT NULL,
     [NoRows] [int] NULL,
 PRIMARY KEY CLUSTERED 
 (
     [ID] ASC
 )WITH (STATISTICS_NORECOMPUTE = OFF, IGNORE_DUP_KEY = OFF) ON [PRIMARY]
 ) ON [PRIMARY]
 GO
 ALTER TABLE [audit].[ProcessingMetrics] ADD  DEFAULT (getdate()) FOR [DateProcessed]
 GO

We can record meta data from the data factory Pipeline as it runs

Stored Procedures in SQL Database (destination)

/*Debbie Edwards
 17/12/2019 Created initial SP
 Create a watermark table
 EXEC [audit].[audit].[USP_Watermark]    '2014-12-31 00:00:00.000'
 */

 ALTER PROCEDURE [audit].[USP_Watermark] @NullDate datetime2

 AS   

 BEGIN

 IF EXISTS (Select * FROM [audit].[IdWatermarks]  
 WHERE TableName = 'DailyMetrics')

 DELETE FROM [audit].[IdWatermarks]  
 WHERE TableName = 'DailyMetrics';

 --DECLARE @NullDate datetime2 SET @NullDate = '2014-12-31 00:00:00.000'

 WITH CTEDailyMetricsDates (DATEUTC)
 AS
 (SELECT ISNULL(MAX(DATEUTC),@NullDate) FROM [audit].[DailyMetricsDates]) 

 INSERT INTO [audit].[IdWatermarks] 
 (TableName, WatermarkValue, WatermarkDate, WatermarkDate2)
 SELECT 'DailyMetrics',CONVERT(bigint,CONVERT(datetime, MAX(DATEUTC))), MAX(DATEUTC), MAX(DATEUTC)
 FROM CTEDailyMetricsDates
 END 

This is the Stored procedure that you run to create the watermark

Currently I’m just running this for one table. You could redesign to run this SP for different tables.

Also note, If there is nothing in the table I am setting a default date to work from @NullDate

/*Debbie Edwards
 18/12/2019 Created initial SP
 Update Processing details
 EXEC [audit].[USP_UpdateMetrics]
 */
 ALTER PROCEDURE [audit].[USP_UpdateMetrics] @TableName varchar(100),   @DateUTC datetime2, 
 @Duration int,  @NoRows int

 AS   

 BEGIN

 INSERT INTO [audit].[ProcessingMetrics]
 (TableName, DateUTC, Duration, NoRows)
 VALUES

 (@TableName, @DateUTC, @Duration, @NoRows)

 END

the Pipeline will run this stored Procedure to add meta data to the ProcessingMetrics table

Data Lake Gen2 Storage Account

Along with the Destination SQL Database you need to have an Azure Data Lake

Quick Set up for the Azure Data Lake. Setting up an Azure Data Lake V2 to use with power BI dataflows in Service (As a data source) …. and Setting up a service principal will give you information on how to:

  • Set up the Storage Account
  • Ensure Hierarchical name space is enabled
  • Create a file system
  • Grant reader Role to power BI service
  • Set up the Service Principal (Set up the App Registration)

Set up Data Factory

Now we are ready to set up everything with a Data Factory

create your data Factory and then go to author and monitor

Connections

AzureSQLDatabasereportingdb is the Source Azure SQL Database

Our Destination is a Destination Azure SQL Database AzureSQLDatabase[destination]reportingdb

And we have a gen 2 Data Lake Storage Account AzureDataLakeStorageGen2 (Which will need the Service Principal account setting up in order to use) See setting up a service principal….

DataSets

the Linked Services are in place. Now we can add Data sets

Source Data Set – Azure SQL database

Add an Azure SQL Server Dataset. the first thing we need are two parameters for the TableName and Table Schema

Connect this up to the Source Linked Service and use the parameters to create a table with schema

The Schema will change when ever you use different table parameters so no need to set at this point

Destination Data Set – Azure SQL database

Destination Data Set – Azure data Lake Gen2

First of all, create a FileName parameter. Because we are creating multiple files, each file needs to be renamed to the UTCDate from the Foreach loop later. We need to set this up within the For each rather than here. Therefore will just set the name as a parameter at this point.

What we want to do is add the file into our file system created in the data lake. and we want to add a date to every single file because these will be the snapshots

In add dynamic content

@dataset().FileName

This is where the actual information for Filename from the data set will be added within the copy activity later.

I imported a schema from a test file I already created.

Pipeline 1 Create Member Daily Metric Dates into destination database

Our first part of the process is to create a list of dates in the source data that we dont yet have in the Data Lake. The first time we run it, thats literally every date we have so far in the source data base

Lets have a look at the Activities in the Pipeline

LookupWatermarkOld

I know that my dates are in datetime2 format so I’m using this and changing it to WatermarkValue so all the steps always use WatermarkValue no matter what the format. Here is the query in full

SELECT MAX(WatermarkDate2) AS WatermarkValue From [audit].[IdWatermarks]
WHERE WatermarkDate2 IS NOT NULL
AND TableName = 'DailyMetrics'

We record the table name of the source in the Watermark table. Basically this will tell us what the date we need to use to work from. remember, we set up a default if there is nothing in the dataset to work with which will run everything into the data lake

CopyDailyMetricsDateUTC

This is where we get to the Copy part of the activity. We are simply copying the dates into the table of the snapshots that we haven’t done yet.

Here we add the parameters of the table we want to use from Source. These parameters were set up in the data set section.

Add a Query. We want the Distinct Date from the source table Where the DATEUTC (The column in the table) is greater than WatermarkValue from the Previous Watermark Activity

SELECT DISTINCT DateUTC FROM [dbo].[DailyMetrics]
WHERE DateUTC > ‘@{activity(‘LookupWatermarkOld’).output.firstRow.WaterMarkValue}’

Now we are at the destination data set

The only item in here is DateUTC

USP.Watermark

This will trigger the Watermark Stored procedure and uses the Azure SQL database destination Linked Service

This is everything required for Section 1 that will run all the dates into our table based on snapshots we haven’t yet prepared

Pipeline 2 CopyMemberDailyMetricsDateUTC

Again, lets have a look at these Activities in more detail

LookupDates

this is the Lookup Activity that takes the full record set of Dates from the destination SQL Server

Note that we haven’t ticked First row only because the entire data set is required

CopyDailyFilesIntoDL (ForEach Activity)

We are taking the output.value from our activity LookupDates

Because it only has one column we don’t need to specify anything further. output.value means the entire record set

Sequential – The Items will be read one by one from the data set

there are 2 activities within this foreach loop. Doubly click on the activity to see what is happening in the loop

Again Lets have a look at this in more detail

CopyDailyMetrics

The source is the table in the source database because we want to store everything in daily snapshot files.

The Query is a SELECT FROM WHERE Statement. Select all the columns from the DailyMetric table where the DateUTC in the source data is Equal to DateUTC in @Item which is generated by the ForEach activity 

the sink uses the Data Lake. Remember, in the data set we set the Filename parameter and here is where is gets set. Click on the Filename to view Dynamic content

This is Concatenating a file name, the Item UTC Date and .csv


Use @item() to iterate over a single enumeration in ForEach activity . This value is generated by the ForEach activity (In the Pipeline)

We are setting the date as a string in order to use within the file name. Because the For each loop is setting the item for us and we are inside this activity we can create the filename in this copy activity rather than in the data set its self.

We can then simply Import schemas to view the mappings between the source and sink

SPUpdateDetails

Finally, we want to keep a record of everything we are going to be doing in the loop so we can run our stored Procedure to add the meta data into a table in our source database

We can use out SQL destination Linked Service for this

the Stored procedure contains 4 parameters.

We can take the Date from the Item in the foreach loop.

Duration, and NoRows can be added from metadata. See https://docs.microsoft.com/en-gb/azure/data-factory/copy-activity-overview Monitor programmatically

  • Duration @activity(‘CopyDailyMetrics’).output.copyDuration
  • No Rows @activity(‘CopyDailyMetrics’).output.rowsRead

the table name is simple DailyMetrics

USP_TruncateMemberDailyMetricsDates

Finally, now that everything is complete we can truncate the date table. Outside of the foreachloop

the max date is held in Watermark which will be used to create the new files Next time (Set in Pipeline 1)

Test your solution

Now we have everything in place we can test each pipeline. By Clicking debug

You can see the files coming in via Azure Table Storage

If you get errors, a great way of debugging is to go into the code. I had an error and after a file nam it had /n/n.

I simply removed this empty row and it worked.

Pipeline 3

There is now a Pipeline 1 to create the dates. And pipeline 2 to create the files. This is good because they can be tested separately.

We need a top level Pipeline to run them

And this is the new model for the flow of this Data factory

Add a trigger

now we have successfully tested the Pipelines we can set them up in a trigger by adding a parent pipeline that runs all the Pipelines in order

Another Post will be created on Adding Triggers

Considerations

You need to make sure that the last file (When you run it is complete) In our case the snapshot table is run at 12 AM and takes around 20 minutes so we need to set this pipeline off at 1 AM

Add Alerts to Monitor the Pipeline

https://azure.microsoft.com/en-gb/blog/create-alerts-to-proactively-monitor-your-data-factory-pipelines/

Another Post will be created on Adding Monitors

Azure Subscriptions

The World of Azure Subscriptions and setting up a good Azure architecture can seem quite daunting (because it is).  Here is a guide to Azure Subscriptions and how they work.

Free Subscription

When you first go into Azure you can start for free.

This is probably the most used subscription starting point. There are services that you can use free for 12 months.  For example:

  • 5GB Blob Storage
  • 5 GB File Storage
  • 250 GB SQL Database
  • 750 hours of Windows VMs
  • 30,000 transactions of AI and machine learning

The list goes on.

You also get 150 credits to use on other services. And in many cases, some services are always free, like functions and App Services

Monthly Azure Credits for Visual Studio Subscribers

If you are a Microsoft Partner you get can get credits through the Microsoft Partner Portal https://partner.microsoft.com/en-GB/

You can either get Visual Studio Enterprise (MPN) or Visual Studio Enterprise if you have a subscription but you are not a microsoft partner.

You get access to your Visual Studio benefits https://my.visualstudio.com/

MPN: Microsoft Partner Network

Note that the Azure service states “Your own personal sandbox for dev/test”

In regards to running Production environments, the guidance states

“Monthly Azure credits for Visual Studio subscribers are specifically for individual dev/test usage only. To run production workloads, you’ll need to upgrade to a paid Azure subscription, such as pay-as-you-go pricing.”

The question is, what does Microsoft consider a Production environment?

And if these are supposed to be for individual use, what should you do when you have multiple developers working on a development project?

Answers coming up later…….

Visual Studio Professional subscription gives you £40 a month credits. Professional costs around £920 for the first year and then yearly renewal is around £613

MSDN Platforms subscription gives you £75 a month credits

This is a new Subscription that provides IT Department with a cost effective way to license Microsoft Software for individuals but don’t require the full suite of Visual Studio Development Tools. Pricing is more complex https://visualstudio.microsoft.com/msdn-platforms/

Create Subscription in Azure

When you go into Azure and search for Subscriptions +Add Subscription you are taken to the following screen. (these are the offers we have available to us. Depending upon your own environment you may have more or less)

Pay as you go

As advertised, this is simply the pay as you go model that many people move to after their free subscription has ended

Pay as you go  is billed at the standard Pay-As-You-Go rates and service level agreements (SLAs) are offered for each of the Azure platform services

Pay as you go Dev/Test

Meets the need of teams of Visual Studio subscribers and is specifically for development and testing only.

Enterprise Costs around £4,602 for the first year and then £1,970 for every subsequent year

Visual Studio Enterprise Solution – MPN

Again, this is specifically for Visual Studio Enterprise Subscribers in the Microsoft Partner Network. This relates to the Monthly Azure Credits for Visual Studio Subscribers section above

Within this service, you get low dev/test rates on VM’s (You pay for the linux rate) You also get low rates on HDInsight and Web Apps.

As mentioned, this is specifically for personal Dev/test Environments. Usage within the subscription does not carry a financially-backed SLA

Azure in Open

You can buy Azure through open licensing programmes from your Microsoft Reseller. Small and medium sized businesses purchase in this way. Simply contact your Microsoft Partner or find one to work with https://www.microsoft.com/en-gb/solution-providers/home

To go for this option, you purchase Azure Monetary Commitment credits from your reseller in the form of an Online Service Activation (OSA) Key. You can use these credits for 12 months following Activation

Other Subscription Offerings

Enterprise Dev-test

Similar to Pay as you go Dev Test, If you have a Microsoft Enterprise Agreement

EA/SA (Enterprise Agreement/ Software Assurance) is a licensing package, targeting large organisations with 500 or more computers. The EA is a three year contract which covers software licensing and updates. Customers can renew for 1 year or 3 years.

Software under EA includes Windows 10, Microsoft office, Windows Server, Exchange, Sharepoint, System Center, Client Access Licenses etc.

To set up a subscription under this offer, you will have an Enterprise Administrator. They can add Account owners to their agreement via Azure Enterprise portal. Then the Account owner can create Subscriptions via the Azure Account portal.

Once in place, active Visual Studio subscribers can be added as co-administrators to manage and use resources.

Visual Studio Enterprise (Bizspark)

In February 2018, BizSpark was replaced by the Microsoft for Startups program and has the same functionality as the Visual Studio Enterprise Subscription with £115 free credits

Azure Hybrid Benefit

Azure Hybrid Use Benefit (HUB) is a discount program for Azure users with Windows Server licences. It can save up to 40% of the normal costs of running Services.

Windows Server is used in business settings. Windows Server is a line of operating system that Microsoft specifically creates for use on a server. It includes Enterprise software because its intended for businesses.

Microsoft Windows Server 2019 pricing is complex so I wont go into detail here, but moving to HUB does provide savings for VMs and databases.

https://azure.microsoft.com/en-gb/pricing/hybrid-benefit/ Azure provides a great calculator for this. If this is an option, you really want to speak to a Microsoft Advisor to understand the best route.

Difference between Dev/ Test and Production Environments

Dev/Test  environments and Visual Studio credits are exclusively for developing and testing applications. These subscriptions don’t carry financially backed SLA’s

Any Subscription over a Visual Studio Subscription is for Dev/test and demonstrate only

It should also be noted that Training is NOT considered a development activity so training resources should be on the appropriate Subscription.

MSDN Licensing is now Visual Studio licensing but the following applies

“The single most important concept when discussing MSDN licensing is to understand the difference between production systems (those which are used to actually make money or carry out the business of an organisation) and development systems (those which actually create the programs and applications used in the production systems)”

IT Asset Management .net (2011)

And there is also the Subscriptions in Dev/ Test being for specific individual useage. For actual Project work where teams are involved, services are cheaper but you don’t get credits.

Is this policed by Microsoft? It is certainly a violation of the terms of use.

c. Suspension. We may suspend your use of the Online Services if: (1) it is reasonably needed to prevent unauthorized access to Customer Data; (2) you fail to respond to a claim of alleged infringement under Section 5 within a reasonable time; (3) you do not pay amounts due under this agreement; (4) you do not abide by the Acceptable Use Policy or you violate other terms of this agreement; or (5) for Limited Offerings, the Subscription becomes inactive from your failure to access the Online Services as described in the Offer Details. If one or more of these conditions occurs, then:

Production subscriptions can be purchased via several means

PAYGO is specified above

EA . Again this is specific to having a EA/SA (Enterprise Agreement/ Software Assurance). See above for more information

CSP (Microsoft Cloud Solution Providers) See Azure in Open for more information above.

Management Groups, Subscriptions and Resource Groups

As an example, imagine you have an Azure environment with just Visual Studio Enterprise Accounts complete with credits for each developer

So far, no thought has been put into creating Management groups

lets have a look at this so far. the decision has been made to split the resource groups up by environment. In this case Proof of concept. However, because we know that this subscription can only be for Dev/Test and POC maybe we need to think about about the hierarchy in a little more detail, bringing in the Management group

Management Group by Environment

Management groups are containers and they help to manage access, policy and compliance across multiple subscriptions. You can use them with Azure policy and Azure Role Based Access Control.

Here we have Management groups split by environment. So under Production we may have all the pay as you go Subscriptions complete with SLA backing. The Test/Dev subscriptions under the other Management Groups when required.

The Resource Groups here as set at Apps level.

You could add a Resource Group for all your SQL Servers and Databases for example. And another one for all your machine learning requirements.

Management Group by Business Area

This is a different way of looking at your hierarchy, by Business Area. Management groups can be up to 6 levels deep which allows you to set up what ever meets your needs. If you worked for other companies you could have a management group for each company for example.

You could then have management groups under this for environment. Next Subscriptions and finally the Resource groups, which can bring together resources that are related.

Don’t forget that Tagging is also an important part of the architecture process

Hopefully that gives a little more structure to what you need to to when thinking about Subscriptions, which then leads into your Management Groups, Resource groups and resources.

Right at the top of your Hierarchy is your Tenant which represents your Organisation. Your tenant is your dedicated Azure AD Service instance.

Understanding what licencing you have to work with, what hierarchies will be the most logical and who you work with within other tenants will really help you get to grips with Azure.

Migrating Adventureworks Data Warehouse from Local Machine (SQL Express) to Azure SQL Server Database

For training courses and general lets have a look at updates to Power BI, an Adventureworks database instance has been set up on my machine, complete with 10 years of data that is great for using for training courses.

However, this database needs moving from its local machine to Azure

Previously bacpac files have been created to import into Azure via SQL Server Management Studio but they have always errored.

Its time to have a look at Azure Data Migration

Source Database

  • Product – Microroft SQL Server Express (64bit)
  • Operating System – Windows 1 Pro
  • Version: 14.0.2027.2
  • Release: SQL Server 2017

Attempt 1

Microsoft Data Migration Assistant

The Microsoft Data Migration Assistant allows you to upgrade to Azure by detecting compatibility issues.

The first thing to do is to download the msi package and then you can get started

Open the Data Migration Assistant

Click New to create a new Project

Then click create

The server would be connected to using Windows Authentication. However there are errors for this. the credentials must have control server permission.

In SSMS go to Security and Logins to find your own user Login.

Switch to the master database and run the following SQL

GRANT CONTROL SERVER TO [User Name];  

Unfortunately the error comes back Securable class ‘server’ not supported in this version of SQL Server.

SSMS is not able to Migrate Express Databases

Attempt 2

b

Move to your Azure connection in SSMS and right click on databases Import Data Tier Application

go through the Import Data Tier guide

Currently we are moving to an S2 model. (Purchase model DTU) which is around £54 a month. When its not being used I will change it to S0, around $10 a month.

There are compatibility issues happening between the Azure database and the SQL Express data base.

The first is regards to COLUMNSTORE. Apparently COLUMNSTORE support is available in S3 and above

S3 costs around £109 pounds a month, twice the cost of S2.

The Solution

Simply Import as S3 and then let Azure Scale to another Standard option by clicking on Pricing tier

You could also move to vCore purchasing options too which is the preferred route as it offers more personalisation.

The DTU-based purchase model are differentiated by a range of compute sizes with a fixed amount of included storage, fixed retention period for backups, and fixed price.

The virtual core (vCore) model provides several benefits:

  • Higher compute, memory, IO, and storage limits.
  • Control over the hardware generation to better match compute and memory requirements of the workload.
  • Pricing discounts for Azure Hybrid Benefit (AHB) and Reserved Instance (RI).
  • Greater transparency in the hardware details that power the compute; facilitates planning for migrations from on-premises deployments.

https://docs.microsoft.com/en-us/azure/sql-database/sql-database-service-tiers-dtu

I can finally move my Express database into Azure and manage the scaling. All sorted.

However you should be aware that if its Under S3 the index gets disabled and Power BI cant use it in this state

So the question is, If you are importing the data into power BI, will you be happy to keep the database at S3 level when its in use OR would be be OK with removing the columnstore index?

this is something to think about……

Setting up a Service Principal for Azure Data Lake Gen 2 (Storage) to use with Data Factory

An Azure service principal is a security identity used by user-created apps, services, and automation tools to access specific Azure resources. Think of it as a ‘user identity’ (login and password or certificate) with a specific role, and tightly controlled permissions to access your resources

Azure Service Principal

I am constantly having to remind myself how to set up the Service Principal for Access to things like Azure Data Lake Gen 2 when I am setting up a data factory (Or using the storage with another web app).

So I wanted to write a blog post specifically on this.

As the example, imagine you are moving data from an Azure SQL Database to files in Azure Data Lake Gen 2 using Azure Data Factory.

You attempt to add a Data Lake Connection but you need a Service Principal account to get everything Authorised.

You need this so the Data Factory will be authorised to read and add data into your data lake

An application (E.g. data Factory) must be able to participate in a flow that requires authentication. It needs to establish Secure credentials. The default method for this is a client ID and a Secret Key.

There are two types of permissions

Application Permissions No user context is required. The App (E.g. data Factory) needs to access the Web API By its self

Delegated Permissions The Client Application (E.g. data Factory) needs to access the Web API as a Signed in User.

Create an App

In Azure choose App Registrations

Here you can create an app – New Registration

Provide a name for your app. e.g. DataFactoryDataLakeApp

Grant your Registered App permissions to Azure Storage

This will enable your app to authorise Requests to the Storage Account With Azure Active Directory (AD)

You can get to your app by going to Azure Active Directory

Then App Registrations and choose the App

In your new App, go to Overview and View API Permissions

Next go to Add a permission

Go to Azure Storage API which contains Data Lake Gen 2

Notice that we are setting up Delegated Permissions for Azure Storage

You are warned that Permissions have been changed and you need to wait a few minutes to grant admin consent.

I am not an admin so I always get my admin to go into Azure Active Directory and Grant Admin Consent for Peak Indicators

Note that your app now has configured permissions for Azure Active Directory Graph and Azure Storage

Assign your new app to a subscription

Now you have an app you need to assign Contributor status to it to the level of service you require in Azure, Subscription level, Resource group level or resource level.

For this app I am going to set it up against the subscription. First go to the Subscription you want to add it to and then Access Control (IAM)

I have added the app as a contributor

Creating a Key Vault

We will be selecting and creating IDs in the next steps, but instead of simply remembering your secret. Why not store it in a Key Vault.

  • Centralise Application Secrets
  • Store Secrets and Keys Securely
  • Monitor Access And Use

Lets set one up in our Proof of Concept area.

Create a Key vault if you don’t have one already

remember to add any tags you need before Review + Create

Once completed you can go to the resource (E.g. Data Factory) but for the time being that is all you need to do

Application ID and Tenant ID

You can now go into your new app in Azure (App registrations) to get more details for Data Factory (When you set up the connection)

Tenant from Data Factory will be mapped to Directory (Tenant ID) from the App Overview

Service Principal ID from Data Factory will be mapped to Application (Client) ID From the App Overview

Create a Client Secret

Next, create your Client Secret.

In your App go to Certificates and Secrets

Click New Client Secret

Im going to allow this secret to Expire in a year (Anything using the app will start to fail so you would need to set a new secret and re-authorise)

We can add this into the Key vault so we don’t lose it because once you have finished here you dont see it again.

Open a new Azure Window and Go to your new Key Vault

Go to Secrets

Click + Generate Import

Notice I have set the expiration date to match the expiry date of the app

Ensuring the Access is set for the Data Lake Storage

For this you need to have a Data Lake Gen 2 set up and Microsoft Azure Storage Explorer downloaded

In Microsoft Azure Storage Explorer, navigate to the storage

Then Right click on the File System (In this case factresellersales) go to Manage Access and add the app.

Notice that we have set Read Write and Execute for the app on the file system and all the files will inherit these permissions

Adding The Data Lake Gen 2 Connector in Data Factory (Test)

I have a Data Lake Gen 2 with some files and I want to move them into a SQL Data base.

To test, Open or create a Data Factory

Go into Author and Monitor. Then Author

Go to Connections, +New and Choose Azure Data Lake Gen 2

Tenant = Directory (Tenant ID) from the App Overview

Service Principal ID = Application (Client) ID From the App Overview

Service Principal Key (You can get it from Azure Key Vault. Click ON secrets,Then the name and current version

You can then copy the secret value and add it into Data Factory

Test your Connection

Create the Data Lake Data Set

Here is where you know that all your efforts all worthwhile.

Create a new Dataset which will be an Azure Datalake Gen 2

This is great. I have access to the files in the data lake. Achievement unlocked.

Use Data Lake Storage V2 as Dataflow Storage

This blog post follows on from https://debbiesmspowerbiazureblog.home.blog/2019/11/28/setting-up-an-azure-data-lake-v2-to-use-with-power-bi-data-flows-in-service-as-a-data-source/

Dataflows are essentially an online collection and storage tool. Power Query Connects to data at source and collects and transforms that data. The dataflow then stores the data in a table within the cloud. They are stored in Data Lakes which is all automated for you.

Dataflows unify data from all your different sources. It should be noted that a Data Warehouse is still the recommended architecture with Data Flows over the top.

Dataflows also introduce the concept of the Common Data Service (CDS) and the Common Data Model (CDM). CDM allows organisations to use data formats to provide consistency across deployments. Now we have Azure Data Lake gen2 storage can be combined with data flows to store the data flows to provide and structured centralised data source.

Thanks to https://docs.microsoft.com/en-us/common-data-model/use for helping me understand the differences between the two

When you integrate CDM with Data Lake Gen 2 you get structural consistency and you can use CDM Folders in the lake that contain your schemas in standard CDM format.

Dataflow definitions and data are stored in Model.json format. If you have a Model.json file, it shows that you are compliant with CDM.

Dataflows store their definition and data in CDM folders, in the Model.json formats. If you have Model.Json it shows you are adhering to CDM.

Of course, this can be quite difficult when you are working with data that does not adhere to CDM format. I can see it being really useful when you are starting from scratch but I have done some work looking at my data sources and they are always quite far from CDM format.

You can find information about the CDM here https://docs.microsoft.com/en-us/common-data-model/

And more information about CDS here

https://docs.microsoft.com/en-us/powerapps/maker/common-data-service/data-platform-intro

Advantages to setting up your own Data Lake Gen2 Store

Essentially, you can get by using the internal Data Lake Store but there are lots of reasons (And some of these advantages will be coming in future releases) why setting your own store up is a good thing.

  • Great for Re-use, If you are given access to the workspace you can use the dataflows already created for you.
  • Centralise your prepped data

Remember this doesn’t replace your data warehouse. It just adds a preparation and transformation layer above the data warehouse. Instead of having to wait to get your small change added to the warehouse you can add it to this layer.

  • Data within your data lake can be integrated into other solutions by developers
  • Data Lake Gen 2 is enormously scale-able for data
  • Dataflow data and definition file can be leveraged by developers for AI Services

Steps to Set Azure Data Lake Gen2 as Dataflow Storage

  • The storage account must be created in the same Azure Active Directory tenant as the Power BI tenant.
  • The storage account must be created in the same region as your Power BI tenant. To determine where you Power BI tenant is located
  • The storage account must have the Hierarchical Name Space feature enabled.
  • Power BI service must be granted a Reader role on the storage account.
  • A File system named powerbi must be created.
  • Power BI services must be authorized to the powerbi filesystem you create.

Once configured, it cant be changed. You cant go back to the default data store for your dataflows

Set Storage Account in Same Region as your Power BI tenant

Log into Power BI service , then Help ? and About Power BI

The Data is Stored in North Europe Ireland

When you set up your Data Lake Ensure North Europe region is selected

Set up Azure Data Lake V2 in Azure Portal

When you go into Azure Currently and look for Data Lake V2 you can only Find Gen 1

So the question is, how do you set up Gen 2 in Azure Portal? (Currently we are on the 25th November 2019. Hopefully this may get easier in the future)

First of all I go to the Subscription where I want to add the new data Lake v2

Open up the Portal menu (Now hidden to the left of the screen)

Choose Create a resource

next Choose Storage and Storage Account

Note that the Account kind is Storage V2 (General Purpose)

Make sure Location is the same as Power BI Service. I’m not using this functionality at the moment but there is no harm in applying this logic.

It is recommended to set replication setting to Read-access geo-redundant storage (RA-GRS)

For the time being, I am leaving everything else as standard

Next go to Advanced

the most important setting here is the Data Lake Storage Gen 2 . Enable the Hierarchical namespace and your storage account will now be created as data Lake Storage V2

Click Review and Create

Grant Reader Role to Power BI Service

This is all built in so it should be fairly straightforward.

In Azure go to your new storage account (If you aren’t already in it) and go to Add role Assignment

One there, choose the reader role and select Power BI Service which as you can see is already in the list.

It takes about 30 minutes for this to take effect.

Create a powerbi file System

Power BI Needs to use a Filesystem specifically named powerbi  so data flows can be stored in this specific file system.

We now have a few options available to us. I have some files to add so I am going to add them to a container

Click on Containers And then + File System

Note that to store dataflows its called powerbi Click OK

clicking on your new storage account(s) you are told to Download Azure Storage Explorer.

I already have this Azure Storage Explorer downloaded. If you don’t have this, its something you will absolutely need to work with Azure Storage accounts.

Once downloaded Open Azure Storage Explorer

You will need to Add in your Azure Storage Accounts by clicking the little connector icon

You will be asked to sign into your Account with your Office 365 credentials and 2fa authentication

This will log you into all your Subscriptions and Services

You are good to go

Here you find your subscription, Then go to the data Lake Storage Gen 2 and find the new File system powerbi.

Grant Power BI permissions to the file system

Before we connect we need to grant permission for Power BI to use the File System (Again this is specific to using DLV2 as a data flow store but at this point we may as well set up the permissions)

go to Azure Portal and Azure Active Directory

then select Enterprise Applications

Change the Application type Drop down to All Applications

Power Query Online and Power BI Premium and Power BI Service are in the list.

You will need the Object IDs of these applications.

Back to Azure Storage Explorer (Manage Access)

Navigate back to powerbi file system, Right click and Choose Manage Access

Click Add, Grab the object ID of Power BI Service to Manage Access

Set Read, Write and Execute Access to Service and Repeat the Process for Power BI Premium

Repeat for Power Query Online but Set Write and Execute Access

Other Also needs setting up as follows

Connect the datalake Gen Storage Account to Power BI Dataflows

To do this you need to be Power BI Admin. go to Power BI Service and navigate to the Admin Portal

From here Connect your Azure Data Lake Storage Gen2.

Add your Subscription ID, Resource group Name and Storage Account name of your Data Lake

It is now connected to Power BI

Allow Admins to Assign Workspaces

Finally, still in Admin Portal, go to dataflow Settings

Switch Allow Workspace admins to assign workspaces to this storage account to On

Workspace admins can now assign workflows to the filesystem created

Things to Consider

Here is where it starts to get a little bit hazy

  • This is all very much still in preview and there will be lots of updates coming
  • Once your dataflow storage location is configured it Cant be changed so dont do this on a whim.
  • You have to be an owner of the dataflow or be authorised to the CDM folder in the data lake to use the data flow
  • Once you have created a dataflow you ant change the storage location
  • It is your organisations data flow so there can only be one.

because of this, and the fact that its still in development I am going to wait to set up a central storage account for our workflows.

Im still unsure what you would do with Workflows that are already set up, Do they stay in the default area or can you reprocess them into the central data lake.

What happens if you want to move the data lake to a new subscription? is it not possible?

I will be going back to this when I have a few more answers to these questions

Setting up an Azure Data Lake V2 to use with power BI dataflows in Service (As a data source)

Previous to the brand new Azure Data Lake, I was adding all the files into Blob Storage. However Azure Data Lake V2 is built on Blob storage and DataLake V1

its built for big data and a fundamental change is that we now have a hierarchical namespace. This organises your files into directories.

So now, we can do things like use all files from a specific Directory, delete all files from a specific directory. We can categorise our files within the data lake.

Set up Azure Data Lake V2 in Azure Portal

When you go into Azure Currently and look for Data Lake V2 you can only Find Gen 1

So the question is, how do you set up Gen 2 in Azure Portal? (Currently we are on the 25th November 2019. Hopefully this may get easier in the future)

First of all I go to the Subscription where I want to add the new data Lake v2

Open up the Portal menu (Now hidden to the left of the screen)

Choose Create a resource

next Choose Storage and Storage Account

Note that the Account kind is Storage V2 (General Purpose)

Ive set the Location to North Europe, Simply because I know thats where our Power BI Data in Services is stored and I may as well stick with this.

For the time being, I am leaving everything else as standard

Next go to Advanced

the most important setting here is the Data Lake Storage Gen 2 . Enable the Hierarchical namespace and your storage account will now be created as data Lake Storage V2

Click Review and Create

Create a file System within a Container

We now have a few options available to us. I have some files to add so I am going to add them to a container

Click on Containers And then + File System

Click OK

clicking on your new storage account(s) you are told to Download Azure Storage Explorer.

I already have this Azure Storage Explorer downloaded. If you don’t have this, its something you will absolutely need to work with Azure Storage accounts.

Once downloaded Open Azure Storage Explorer

You will need to Add in your Azure Storage Accounts by clicking the little connector icon

You will be asked to sign into your Account with your Office 365 credentials and 2fa authentication

This will log you into all your Subscriptions and Services

You are good to go

Here you find your subscription, Then go to the Data Lake Storage Gen 2 and find the new File system.

I have added a folder here called Workshop1Files to my File System

Obviously Data Lake Storage gives you so many ways of working with files and automating the files to the storage area. In this case I am going to simply move a file into my new folder to work with

Double click on the folder and then Click Upload and Upload Files

And now your file is in the cloud, in an Azure Data Lake ready to use.

Connect to your Azure File with Power BI Desktop

The first test is can we access this data within Power BI Desktop.

Open Power BI Desktop and Get Data

Choose Azure Data Lake Storage Gen2 (Currently in Beta)

Add the URL

Data Lake Storage Gen2 have the following pattern https://<accountname>.dfs.core.windows.net/<filesystemname>/<subfolder> 

Data Lake Storage Gen2 have the following pattern https://<accountname>.dfs.core.windows.net/<filesystemname>/<subfolder> 

If you go to Right click on the file in Storage Explorer and go to properties, there is a difference in structure

http://<accountname&gt;.blob.core.windows.net/<filesystemname>/<subfolder>

If you try to connect with the original URL from Data Storage you get the following error

And if you change the URL from blob to dfs

There is a missing part to the puzzle. Go back to the Azure Data Lake Storage Account in Azure and Add Storage Blob Data Reader to your account

Then try again and hopefully you are in .

No need to combine because we have specified the file.

There are different ways you can load the file. I loaded one file but you can load all files in the File System

https://storageaccount.dfs.core.windows.net/filesystemname

or all files under a directory in the file system (You can include sub directories in this)

https://storageaccount.dfs.core.windows.net/filesystemname/directoryname/directoryname

Connect to your Azure File with Power BI Data Flow

I am creating data flows in the power BI Service to ensure they can be reused across the company. The question is, Can I Connect to the above File in Service via a data flow

In Power BI Service, add a Data Flow which takes you into Power BI Query Editor in the Service. I already had some data flows connected to an Azure database.

The data is in Azure Data Lake Storage so the first think I do is try the Azure route

However, there is no Azure Data Lake Storage Gen 2. This must be something coming in the future. so then I go to File and click on Get Data text / csv

You will need to add the File Path and your Credentials (As per previous advice use dfs not blob in the URL. this seems a little flaky at the moment. I choose Organisational Account first before adding the URL and then it seems to work.

Remember Go back to Azure Storage Explorer. if you click on properties, you can grab the URL from here

We don’t need a Gateway Setting up because everything is now in the cloud.

Clicking next, Nothing happens, it just keeps bouncing back to the same window.

Attempting to use the Blob Storage connector also doesn’t work (Using the Azure Account Key as authentication).

with blob in the URL
With dfs in the URL

It would appear that currently I have hit a brick wall and there is no current DLGen2 connector for Data Flows.

I will be keeping an eye open on this because obviously, when you are pushing the new generation of Data Lakes and Data Flows then there needs to be a DLGen2 Connector for Data Flows.

Update

Had a reply back on the Power BI Forum (Not a good one)

The feature haven’t been planed. If there is any new message, the document: What’s new and planned for Common Data Model and data integration  will be updated.

I have found this in Ideas

https://ideas.powerbi.com/forums/265200-power-bi-ideas/suggestions/38930032-add-azure-data-lake-storage-gen2-as-a-data-sourc

Please help us get this working by voting for this idea.

Design a site like this with WordPress.com
Get started