Azure Data Factory Moving from development and Production – Part 2. Using Key vault for Linked Services

In Azure Data Factory Moving from development and Production We looked at how we can use Azure DevOps to move the Json Code for Development Data Factory from development to Production.

Its going well, I have however been left with an issue. every time I move into Production details for the Linked Services have to be re added. Lets have a look at the SQL Server and the Data Lake gen 2 account.

Development

Notice that the information has been entered manually including the Storage account Key.

Again, in this instance the information has been entered manually. SQL Server Authentication is being used because we have a user in the SQL DB with all the privileges that Data Factory Needs.

DevOps Data Factory release Pipeline

Go into Edit of the Release Pipeline

Within Prod Stage we have an Agent Process

We are looking for the Section Override Template Parameters

Note that currently Account Key and SQL Database Connection String are null.

Provisioning Azure Key vault to hold the Secrets

Managed Identity for Data Factory

Copy your Azure Data Factory Name from Data Factory in Azure

You need to have a Key vault set up in Development

GET and LIST allows Data Factory to get information from the Key Vault for secrets

Paste the data factory name into Select Principal

Key Vault, create a Secret for the Azure Data Lake Storage

For the Key Vault Secret. I gave it the Secret value by copying across the Access Key from the Azure Storage Account Keys Section

The Content type was simply set as the name of the Storage Account for this excercise

In Data Factory Create a Linked Service to the Key Vault

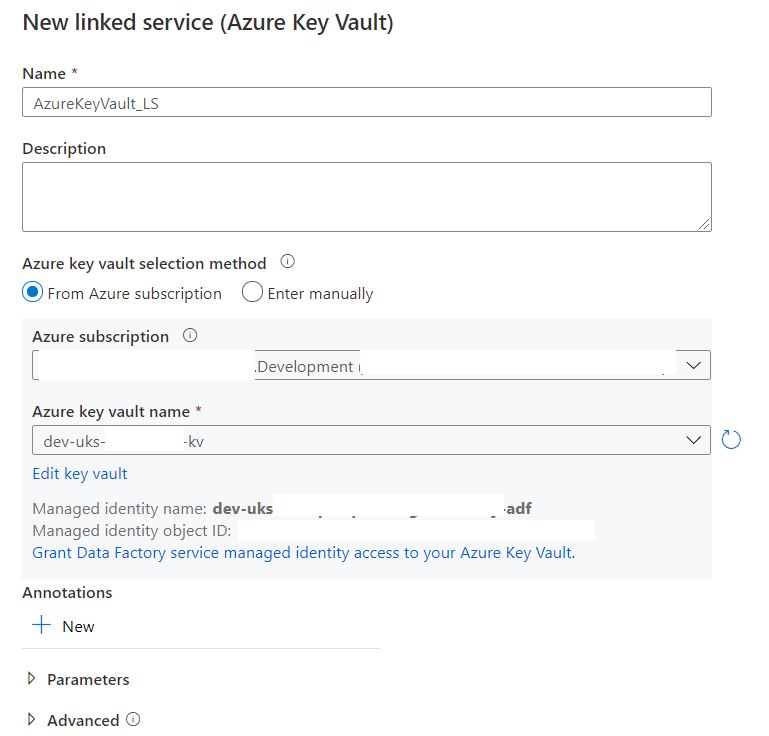
Test and ensure it successfully connects

Use the New Key Vault to reset the data Lake Linked Service

How does this Data Lake Linked Service change the DevOps Release Pipeline?

Its time to release our new Data factory settings into Production. Make sure you have Published Data Factory into Devops Git.

Production Key vault Updates

We need to update Production in the same way as Development

  1. In Production Key vault add the Production data factory name to Access Policies (as an Application) With Get and List on the Secret
  2. Ensure that there is a Secret for the Production Data Lake Key AzureDataLakeStorageGen2_LS_accountKey
  3. Check your Key vault connection works in Production before the next step

Azure DevOps Repos

In Azure Devops go to your Data Factory Repos

Notice that your Linked Service information for the Data Lake now mentions the Key Vault Secret. its not hardcoded anymore which is exactly what we want

Azure DevOps Release Pipeline

Go to Edit in the Data Factory release pipeline

When the job in Prod is clicked on, you can go to the Override Parameters Section. And notice there is now an error

AzureKeyVault1_properties_typeProperties_baseUrl is the missing Parameter. Basically at this point you need to delete the code in the Override template Parameters box and then click the button to regenerate the new parameters

Override with production information (I saved the code so I could re copy the bits I need.

Once done, notice that the -AzureDataLakeStorageGen2_LS_accountKey “” parameter is now gone because its being handled by the key vault.

Lets Save and Create a Release

New failures in the Release

2021-02-08T13:45:13.7321486Z ##[error]ResourceNotFound: The Resource ‘Microsoft.DataFactory/factories/prod-uks-Project-adf’ under resource group ‘prd-uks-Project-rg’ was not found. For more details please go to https://aka.ms/ARMResourceNotFoundFix

Make sure that your override parameters are ok. I updated:

  • Data Factory name from Data Factory
  • Primary endpoint data Lake Storage from Properties
  • Vault URI from Key vault Properties

Repeat the Process for SQL Database

With everything in place we need to introduce a connection string into Key Vault

I have a user set up in my SQL database. the user has GRANT SELECT, INSERT, UPDATE, DELETE, EXEC, ALTER on all Schemas

I want to include the user name and password in the Connection string and use SQL authentication

Secret Name

AzureSQLDatabase-project-ConnectionString

Secret

 Server=tcp:dev-uks-project-sql.database.windows.net,1433; Database= dev-uks-project-sqldb; User Id= projectDBowner;Password= Password1;

the connection string has been set as above. For more information on connection strings see SQL Server connection Strings

Go back to Data factory and set up the new secret for SQL Server

This is successful

Data Factory and DevOps

  1. back in Data Factory Publish the new linked Service Code
  2. go into Dev Repos and check in Linked Service code you are happy with the new Key vault information
  3. Go to Prod Key vault and make sure you are the Secret is set with the Connection String for SQL DB
  4. Test the Key vault secret works in Prod
  5. Back in DevOps Go to Release pipelines and Edit for the adf Release CD pipeline (Release Pipelines are Continuous Delivery. Build pipelines are CI for Continuous Integration)
  6. Edit Prod Stage (I only have Prod) Arm Template Deployment Task, Copy Overwrite Template Parameters code into a file for later
  7. Delete the code and click the … to get the latest parameter information
  8. Re add your production parameters, most can be taken from the code you just copied.
  9. Create a new Release
  10. go to Linked Services in Data Factory and check they are still Production. They still use Key vault and they still work

Now this is all in place, Development Data factory can be published up to production. there is no need to reset Linked Services and all your information about Keys and passwords are hidden in the Key Vault

Data Factory to move daily snapshot data in Azure SQL DB to files in a Gen2 Data Lake

I have the following problem to resolve (And this was my initial attempt at figuring out a solution)

I have a data source with data that contains a date. the data contains daily snapshot of a record. this means that a record will be in the data set once per day. This will amount to a lot of data and we would rather hold it as files in Azure Data Lake Gen2 Storage

The logic is to pull daily files from the source database into dated files within the Azure data Lake

Once running this will probably pick up a days data because the rest are already created. However on the initial run I want it to pick up all the days that have been loading.

At the minute I have about 6 months of data to load

Tables in Azure SQL Database (destination)

CREATE TABLE [audit].[MemberDailyMetricsDates](
     [DATEUTC] datetime2 NULL
 ) ON [PRIMARY]

This table collects all the dates from the source snapshot table

Remember, the table records the same record every day with any changes to the record.

CREATE TABLE [audit].[IdWatermarks](
     [TableName] nvarchar NOT NULL,
     [WatermarkValue] [bigint] NOT NULL,
     [WatermarkDate] [datetime] NULL,
     [WatermarkDate2] datetime2 NULL
 ) ON [PRIMARY]
 GO

this is where I add the dates from the tables to show where we are.

For example if we add the last lot of data from 02/01/2020 then this value will be stored in the watermark table. I record them in different formats just in case.

CREATE TABLE [audit].[ProcessingMetrics](
     [ID] [int] IDENTITY(1,1) NOT NULL,
     [TableName] varchar NULL,
     [DateProcessed] [datetime] NULL,
     [DateUTC] datetime2 NOT NULL,
     [Duration] [int] NOT NULL,
     [NoRows] [int] NULL,
 PRIMARY KEY CLUSTERED 
 (
     [ID] ASC
 )WITH (STATISTICS_NORECOMPUTE = OFF, IGNORE_DUP_KEY = OFF) ON [PRIMARY]
 ) ON [PRIMARY]
 GO
 ALTER TABLE [audit].[ProcessingMetrics] ADD  DEFAULT (getdate()) FOR [DateProcessed]
 GO

We can record meta data from the data factory Pipeline as it runs

Stored Procedures in SQL Database (destination)

/*Debbie Edwards
 17/12/2019 Created initial SP
 Create a watermark table
 EXEC [audit].[audit].[USP_Watermark]    '2014-12-31 00:00:00.000'
 */

 ALTER PROCEDURE [audit].[USP_Watermark] @NullDate datetime2

 AS   

 BEGIN

 IF EXISTS (Select * FROM [audit].[IdWatermarks]  
 WHERE TableName = 'DailyMetrics')

 DELETE FROM [audit].[IdWatermarks]  
 WHERE TableName = 'DailyMetrics';

 --DECLARE @NullDate datetime2 SET @NullDate = '2014-12-31 00:00:00.000'

 WITH CTEDailyMetricsDates (DATEUTC)
 AS
 (SELECT ISNULL(MAX(DATEUTC),@NullDate) FROM [audit].[DailyMetricsDates]) 

 INSERT INTO [audit].[IdWatermarks] 
 (TableName, WatermarkValue, WatermarkDate, WatermarkDate2)
 SELECT 'DailyMetrics',CONVERT(bigint,CONVERT(datetime, MAX(DATEUTC))), MAX(DATEUTC), MAX(DATEUTC)
 FROM CTEDailyMetricsDates
 END 

This is the Stored procedure that you run to create the watermark

Currently I’m just running this for one table. You could redesign to run this SP for different tables.

Also note, If there is nothing in the table I am setting a default date to work from @NullDate

/*Debbie Edwards
 18/12/2019 Created initial SP
 Update Processing details
 EXEC [audit].[USP_UpdateMetrics]
 */
 ALTER PROCEDURE [audit].[USP_UpdateMetrics] @TableName varchar(100),   @DateUTC datetime2, 
 @Duration int,  @NoRows int

 AS   

 BEGIN

 INSERT INTO [audit].[ProcessingMetrics]
 (TableName, DateUTC, Duration, NoRows)
 VALUES

 (@TableName, @DateUTC, @Duration, @NoRows)

 END

the Pipeline will run this stored Procedure to add meta data to the ProcessingMetrics table

Data Lake Gen2 Storage Account

Along with the Destination SQL Database you need to have an Azure Data Lake

Quick Set up for the Azure Data Lake. Setting up an Azure Data Lake V2 to use with power BI dataflows in Service (As a data source) …. and Setting up a service principal will give you information on how to:

  • Set up the Storage Account
  • Ensure Hierarchical name space is enabled
  • Create a file system
  • Grant reader Role to power BI service
  • Set up the Service Principal (Set up the App Registration)

Set up Data Factory

Now we are ready to set up everything with a Data Factory

create your data Factory and then go to author and monitor

Connections

AzureSQLDatabasereportingdb is the Source Azure SQL Database

Our Destination is a Destination Azure SQL Database AzureSQLDatabase[destination]reportingdb

And we have a gen 2 Data Lake Storage Account AzureDataLakeStorageGen2 (Which will need the Service Principal account setting up in order to use) See setting up a service principal….

DataSets

the Linked Services are in place. Now we can add Data sets

Source Data Set – Azure SQL database

Add an Azure SQL Server Dataset. the first thing we need are two parameters for the TableName and Table Schema

Connect this up to the Source Linked Service and use the parameters to create a table with schema

The Schema will change when ever you use different table parameters so no need to set at this point

Destination Data Set – Azure SQL database

Destination Data Set – Azure data Lake Gen2

First of all, create a FileName parameter. Because we are creating multiple files, each file needs to be renamed to the UTCDate from the Foreach loop later. We need to set this up within the For each rather than here. Therefore will just set the name as a parameter at this point.

What we want to do is add the file into our file system created in the data lake. and we want to add a date to every single file because these will be the snapshots

In add dynamic content

@dataset().FileName

This is where the actual information for Filename from the data set will be added within the copy activity later.

I imported a schema from a test file I already created.

Pipeline 1 Create Member Daily Metric Dates into destination database

Our first part of the process is to create a list of dates in the source data that we dont yet have in the Data Lake. The first time we run it, thats literally every date we have so far in the source data base

Lets have a look at the Activities in the Pipeline

LookupWatermarkOld

I know that my dates are in datetime2 format so I’m using this and changing it to WatermarkValue so all the steps always use WatermarkValue no matter what the format. Here is the query in full

SELECT MAX(WatermarkDate2) AS WatermarkValue From [audit].[IdWatermarks]
WHERE WatermarkDate2 IS NOT NULL
AND TableName = 'DailyMetrics'

We record the table name of the source in the Watermark table. Basically this will tell us what the date we need to use to work from. remember, we set up a default if there is nothing in the dataset to work with which will run everything into the data lake

CopyDailyMetricsDateUTC

This is where we get to the Copy part of the activity. We are simply copying the dates into the table of the snapshots that we haven’t done yet.

Here we add the parameters of the table we want to use from Source. These parameters were set up in the data set section.

Add a Query. We want the Distinct Date from the source table Where the DATEUTC (The column in the table) is greater than WatermarkValue from the Previous Watermark Activity

SELECT DISTINCT DateUTC FROM [dbo].[DailyMetrics]
WHERE DateUTC > ‘@{activity(‘LookupWatermarkOld’).output.firstRow.WaterMarkValue}’

Now we are at the destination data set

The only item in here is DateUTC

USP.Watermark

This will trigger the Watermark Stored procedure and uses the Azure SQL database destination Linked Service

This is everything required for Section 1 that will run all the dates into our table based on snapshots we haven’t yet prepared

Pipeline 2 CopyMemberDailyMetricsDateUTC

Again, lets have a look at these Activities in more detail

LookupDates

this is the Lookup Activity that takes the full record set of Dates from the destination SQL Server

Note that we haven’t ticked First row only because the entire data set is required

CopyDailyFilesIntoDL (ForEach Activity)

We are taking the output.value from our activity LookupDates

Because it only has one column we don’t need to specify anything further. output.value means the entire record set

Sequential – The Items will be read one by one from the data set

there are 2 activities within this foreach loop. Doubly click on the activity to see what is happening in the loop

Again Lets have a look at this in more detail

CopyDailyMetrics

The source is the table in the source database because we want to store everything in daily snapshot files.

The Query is a SELECT FROM WHERE Statement. Select all the columns from the DailyMetric table where the DateUTC in the source data is Equal to DateUTC in @Item which is generated by the ForEach activity 

the sink uses the Data Lake. Remember, in the data set we set the Filename parameter and here is where is gets set. Click on the Filename to view Dynamic content

This is Concatenating a file name, the Item UTC Date and .csv


Use @item() to iterate over a single enumeration in ForEach activity . This value is generated by the ForEach activity (In the Pipeline)

We are setting the date as a string in order to use within the file name. Because the For each loop is setting the item for us and we are inside this activity we can create the filename in this copy activity rather than in the data set its self.

We can then simply Import schemas to view the mappings between the source and sink

SPUpdateDetails

Finally, we want to keep a record of everything we are going to be doing in the loop so we can run our stored Procedure to add the meta data into a table in our source database

We can use out SQL destination Linked Service for this

the Stored procedure contains 4 parameters.

We can take the Date from the Item in the foreach loop.

Duration, and NoRows can be added from metadata. See https://docs.microsoft.com/en-gb/azure/data-factory/copy-activity-overview Monitor programmatically

  • Duration @activity(‘CopyDailyMetrics’).output.copyDuration
  • No Rows @activity(‘CopyDailyMetrics’).output.rowsRead

the table name is simple DailyMetrics

USP_TruncateMemberDailyMetricsDates

Finally, now that everything is complete we can truncate the date table. Outside of the foreachloop

the max date is held in Watermark which will be used to create the new files Next time (Set in Pipeline 1)

Test your solution

Now we have everything in place we can test each pipeline. By Clicking debug

You can see the files coming in via Azure Table Storage

If you get errors, a great way of debugging is to go into the code. I had an error and after a file nam it had /n/n.

I simply removed this empty row and it worked.

Pipeline 3

There is now a Pipeline 1 to create the dates. And pipeline 2 to create the files. This is good because they can be tested separately.

We need a top level Pipeline to run them

And this is the new model for the flow of this Data factory

Add a trigger

now we have successfully tested the Pipelines we can set them up in a trigger by adding a parent pipeline that runs all the Pipelines in order

Another Post will be created on Adding Triggers

Considerations

You need to make sure that the last file (When you run it is complete) In our case the snapshot table is run at 12 AM and takes around 20 minutes so we need to set this pipeline off at 1 AM

Add Alerts to Monitor the Pipeline

https://azure.microsoft.com/en-gb/blog/create-alerts-to-proactively-monitor-your-data-factory-pipelines/

Another Post will be created on Adding Monitors

Use Data Lake Storage V2 as Dataflow Storage

This blog post follows on from https://debbiesmspowerbiazureblog.home.blog/2019/11/28/setting-up-an-azure-data-lake-v2-to-use-with-power-bi-data-flows-in-service-as-a-data-source/

Dataflows are essentially an online collection and storage tool. Power Query Connects to data at source and collects and transforms that data. The dataflow then stores the data in a table within the cloud. They are stored in Data Lakes which is all automated for you.

Dataflows unify data from all your different sources. It should be noted that a Data Warehouse is still the recommended architecture with Data Flows over the top.

Dataflows also introduce the concept of the Common Data Service (CDS) and the Common Data Model (CDM). CDM allows organisations to use data formats to provide consistency across deployments. Now we have Azure Data Lake gen2 storage can be combined with data flows to store the data flows to provide and structured centralised data source.

Thanks to https://docs.microsoft.com/en-us/common-data-model/use for helping me understand the differences between the two

When you integrate CDM with Data Lake Gen 2 you get structural consistency and you can use CDM Folders in the lake that contain your schemas in standard CDM format.

Dataflow definitions and data are stored in Model.json format. If you have a Model.json file, it shows that you are compliant with CDM.

Dataflows store their definition and data in CDM folders, in the Model.json formats. If you have Model.Json it shows you are adhering to CDM.

Of course, this can be quite difficult when you are working with data that does not adhere to CDM format. I can see it being really useful when you are starting from scratch but I have done some work looking at my data sources and they are always quite far from CDM format.

You can find information about the CDM here https://docs.microsoft.com/en-us/common-data-model/

And more information about CDS here

https://docs.microsoft.com/en-us/powerapps/maker/common-data-service/data-platform-intro

Advantages to setting up your own Data Lake Gen2 Store

Essentially, you can get by using the internal Data Lake Store but there are lots of reasons (And some of these advantages will be coming in future releases) why setting your own store up is a good thing.

  • Great for Re-use, If you are given access to the workspace you can use the dataflows already created for you.
  • Centralise your prepped data

Remember this doesn’t replace your data warehouse. It just adds a preparation and transformation layer above the data warehouse. Instead of having to wait to get your small change added to the warehouse you can add it to this layer.

  • Data within your data lake can be integrated into other solutions by developers
  • Data Lake Gen 2 is enormously scale-able for data
  • Dataflow data and definition file can be leveraged by developers for AI Services

Steps to Set Azure Data Lake Gen2 as Dataflow Storage

  • The storage account must be created in the same Azure Active Directory tenant as the Power BI tenant.
  • The storage account must be created in the same region as your Power BI tenant. To determine where you Power BI tenant is located
  • The storage account must have the Hierarchical Name Space feature enabled.
  • Power BI service must be granted a Reader role on the storage account.
  • A File system named powerbi must be created.
  • Power BI services must be authorized to the powerbi filesystem you create.

Once configured, it cant be changed. You cant go back to the default data store for your dataflows

Set Storage Account in Same Region as your Power BI tenant

Log into Power BI service , then Help ? and About Power BI

The Data is Stored in North Europe Ireland

When you set up your Data Lake Ensure North Europe region is selected

Set up Azure Data Lake V2 in Azure Portal

When you go into Azure Currently and look for Data Lake V2 you can only Find Gen 1

So the question is, how do you set up Gen 2 in Azure Portal? (Currently we are on the 25th November 2019. Hopefully this may get easier in the future)

First of all I go to the Subscription where I want to add the new data Lake v2

Open up the Portal menu (Now hidden to the left of the screen)

Choose Create a resource

next Choose Storage and Storage Account

Note that the Account kind is Storage V2 (General Purpose)

Make sure Location is the same as Power BI Service. I’m not using this functionality at the moment but there is no harm in applying this logic.

It is recommended to set replication setting to Read-access geo-redundant storage (RA-GRS)

For the time being, I am leaving everything else as standard

Next go to Advanced

the most important setting here is the Data Lake Storage Gen 2 . Enable the Hierarchical namespace and your storage account will now be created as data Lake Storage V2

Click Review and Create

Grant Reader Role to Power BI Service

This is all built in so it should be fairly straightforward.

In Azure go to your new storage account (If you aren’t already in it) and go to Add role Assignment

One there, choose the reader role and select Power BI Service which as you can see is already in the list.

It takes about 30 minutes for this to take effect.

Create a powerbi file System

Power BI Needs to use a Filesystem specifically named powerbi  so data flows can be stored in this specific file system.

We now have a few options available to us. I have some files to add so I am going to add them to a container

Click on Containers And then + File System

Note that to store dataflows its called powerbi Click OK

clicking on your new storage account(s) you are told to Download Azure Storage Explorer.

I already have this Azure Storage Explorer downloaded. If you don’t have this, its something you will absolutely need to work with Azure Storage accounts.

Once downloaded Open Azure Storage Explorer

You will need to Add in your Azure Storage Accounts by clicking the little connector icon

You will be asked to sign into your Account with your Office 365 credentials and 2fa authentication

This will log you into all your Subscriptions and Services

You are good to go

Here you find your subscription, Then go to the data Lake Storage Gen 2 and find the new File system powerbi.

Grant Power BI permissions to the file system

Before we connect we need to grant permission for Power BI to use the File System (Again this is specific to using DLV2 as a data flow store but at this point we may as well set up the permissions)

go to Azure Portal and Azure Active Directory

then select Enterprise Applications

Change the Application type Drop down to All Applications

Power Query Online and Power BI Premium and Power BI Service are in the list.

You will need the Object IDs of these applications.

Back to Azure Storage Explorer (Manage Access)

Navigate back to powerbi file system, Right click and Choose Manage Access

Click Add, Grab the object ID of Power BI Service to Manage Access

Set Read, Write and Execute Access to Service and Repeat the Process for Power BI Premium

Repeat for Power Query Online but Set Write and Execute Access

Other Also needs setting up as follows

Connect the datalake Gen Storage Account to Power BI Dataflows

To do this you need to be Power BI Admin. go to Power BI Service and navigate to the Admin Portal

From here Connect your Azure Data Lake Storage Gen2.

Add your Subscription ID, Resource group Name and Storage Account name of your Data Lake

It is now connected to Power BI

Allow Admins to Assign Workspaces

Finally, still in Admin Portal, go to dataflow Settings

Switch Allow Workspace admins to assign workspaces to this storage account to On

Workspace admins can now assign workflows to the filesystem created

Things to Consider

Here is where it starts to get a little bit hazy

  • This is all very much still in preview and there will be lots of updates coming
  • Once your dataflow storage location is configured it Cant be changed so dont do this on a whim.
  • You have to be an owner of the dataflow or be authorised to the CDM folder in the data lake to use the data flow
  • Once you have created a dataflow you ant change the storage location
  • It is your organisations data flow so there can only be one.

because of this, and the fact that its still in development I am going to wait to set up a central storage account for our workflows.

Im still unsure what you would do with Workflows that are already set up, Do they stay in the default area or can you reprocess them into the central data lake.

What happens if you want to move the data lake to a new subscription? is it not possible?

I will be going back to this when I have a few more answers to these questions

Setting up an Azure Data Lake V2 to use with power BI dataflows in Service (As a data source)

Previous to the brand new Azure Data Lake, I was adding all the files into Blob Storage. However Azure Data Lake V2 is built on Blob storage and DataLake V1

its built for big data and a fundamental change is that we now have a hierarchical namespace. This organises your files into directories.

So now, we can do things like use all files from a specific Directory, delete all files from a specific directory. We can categorise our files within the data lake.

Set up Azure Data Lake V2 in Azure Portal

When you go into Azure Currently and look for Data Lake V2 you can only Find Gen 1

So the question is, how do you set up Gen 2 in Azure Portal? (Currently we are on the 25th November 2019. Hopefully this may get easier in the future)

First of all I go to the Subscription where I want to add the new data Lake v2

Open up the Portal menu (Now hidden to the left of the screen)

Choose Create a resource

next Choose Storage and Storage Account

Note that the Account kind is Storage V2 (General Purpose)

Ive set the Location to North Europe, Simply because I know thats where our Power BI Data in Services is stored and I may as well stick with this.

For the time being, I am leaving everything else as standard

Next go to Advanced

the most important setting here is the Data Lake Storage Gen 2 . Enable the Hierarchical namespace and your storage account will now be created as data Lake Storage V2

Click Review and Create

Create a file System within a Container

We now have a few options available to us. I have some files to add so I am going to add them to a container

Click on Containers And then + File System

Click OK

clicking on your new storage account(s) you are told to Download Azure Storage Explorer.

I already have this Azure Storage Explorer downloaded. If you don’t have this, its something you will absolutely need to work with Azure Storage accounts.

Once downloaded Open Azure Storage Explorer

You will need to Add in your Azure Storage Accounts by clicking the little connector icon

You will be asked to sign into your Account with your Office 365 credentials and 2fa authentication

This will log you into all your Subscriptions and Services

You are good to go

Here you find your subscription, Then go to the Data Lake Storage Gen 2 and find the new File system.

I have added a folder here called Workshop1Files to my File System

Obviously Data Lake Storage gives you so many ways of working with files and automating the files to the storage area. In this case I am going to simply move a file into my new folder to work with

Double click on the folder and then Click Upload and Upload Files

And now your file is in the cloud, in an Azure Data Lake ready to use.

Connect to your Azure File with Power BI Desktop

The first test is can we access this data within Power BI Desktop.

Open Power BI Desktop and Get Data

Choose Azure Data Lake Storage Gen2 (Currently in Beta)

Add the URL

Data Lake Storage Gen2 have the following pattern https://<accountname>.dfs.core.windows.net/<filesystemname>/<subfolder> 

Data Lake Storage Gen2 have the following pattern https://<accountname>.dfs.core.windows.net/<filesystemname>/<subfolder> 

If you go to Right click on the file in Storage Explorer and go to properties, there is a difference in structure

http://<accountname&gt;.blob.core.windows.net/<filesystemname>/<subfolder>

If you try to connect with the original URL from Data Storage you get the following error

And if you change the URL from blob to dfs

There is a missing part to the puzzle. Go back to the Azure Data Lake Storage Account in Azure and Add Storage Blob Data Reader to your account

Then try again and hopefully you are in .

No need to combine because we have specified the file.

There are different ways you can load the file. I loaded one file but you can load all files in the File System

https://storageaccount.dfs.core.windows.net/filesystemname

or all files under a directory in the file system (You can include sub directories in this)

https://storageaccount.dfs.core.windows.net/filesystemname/directoryname/directoryname

Connect to your Azure File with Power BI Data Flow

I am creating data flows in the power BI Service to ensure they can be reused across the company. The question is, Can I Connect to the above File in Service via a data flow

In Power BI Service, add a Data Flow which takes you into Power BI Query Editor in the Service. I already had some data flows connected to an Azure database.

The data is in Azure Data Lake Storage so the first think I do is try the Azure route

However, there is no Azure Data Lake Storage Gen 2. This must be something coming in the future. so then I go to File and click on Get Data text / csv

You will need to add the File Path and your Credentials (As per previous advice use dfs not blob in the URL. this seems a little flaky at the moment. I choose Organisational Account first before adding the URL and then it seems to work.

Remember Go back to Azure Storage Explorer. if you click on properties, you can grab the URL from here

We don’t need a Gateway Setting up because everything is now in the cloud.

Clicking next, Nothing happens, it just keeps bouncing back to the same window.

Attempting to use the Blob Storage connector also doesn’t work (Using the Azure Account Key as authentication).

with blob in the URL
With dfs in the URL

It would appear that currently I have hit a brick wall and there is no current DLGen2 connector for Data Flows.

I will be keeping an eye open on this because obviously, when you are pushing the new generation of Data Lakes and Data Flows then there needs to be a DLGen2 Connector for Data Flows.

Update

Had a reply back on the Power BI Forum (Not a good one)

The feature haven’t been planed. If there is any new message, the document: What’s new and planned for Common Data Model and data integration  will be updated.

I have found this in Ideas

https://ideas.powerbi.com/forums/265200-power-bi-ideas/suggestions/38930032-add-azure-data-lake-storage-gen2-as-a-data-sourc

Please help us get this working by voting for this idea.

Design a site like this with WordPress.com
Get started